30 Simple Nail Paint Designs for Beginners. I’ll be honest with you — when I first started doing my own nails at home, I ruined more manicures than I can count. Streaky polish, smudged tips, bubbles everywhere. It took a lot of patience (and a lot of acetones) before I figured out that the secret wasn’t expensive tools or professional training. It was starting simple and being consistent.
If you’re at the beginning of your nail journey, this guide is written specifically for you. These 30 designs are ones I’ve personally tried, tested, or seen work brilliantly for beginners — and in 2026, “simple” is genuinely the aesthetic everyone wants anyway.
Why Simple Nail Designs Are Having a Major Moment Right Now
There’s been a noticeable shift in nail trends over the past year. The over-the-top 3D nail art and elaborate gel sculptures that once dominated social media are taking a back seat to something cleaner and more wearable. Minimalist nail design is dominating Pinterest boards, Instagram reels, and YouTube tutorials alike — and for good reason.
Simple designs are faster to do, last longer without looking “grown out,” and honestly just photograph better. They work with every outfit, every occasion, and every skin tone. And crucially for beginners, they’re forgiving. A tiny wobble in a thin line is barely noticeable. A tiny wobble in an elaborate character nail design? Very noticeable.
30 Nail Paint Designs Perfect for Beginners


Everyday Classics
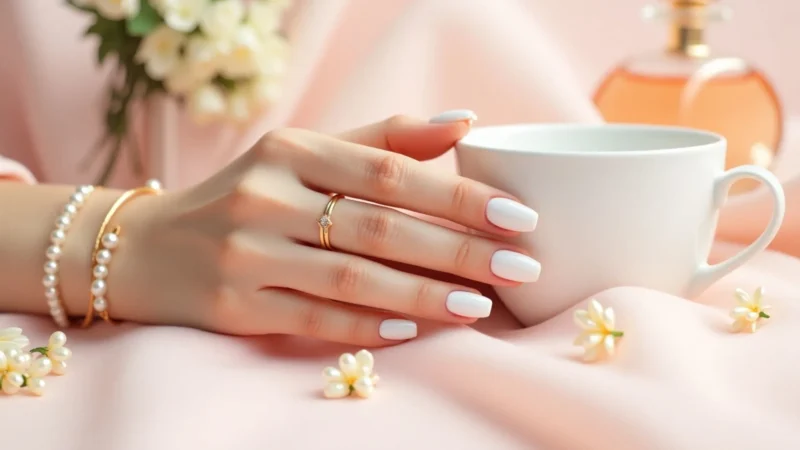
- One-Shade Wonder Pick one nail polish — a warm nude, a dusty rose, or a clean white — and apply two thin coats. This isn’t boring; it’s intentional. A well-applied single color with a glossy top coat looks more polished than a rushed nail art attempt. Master this first.
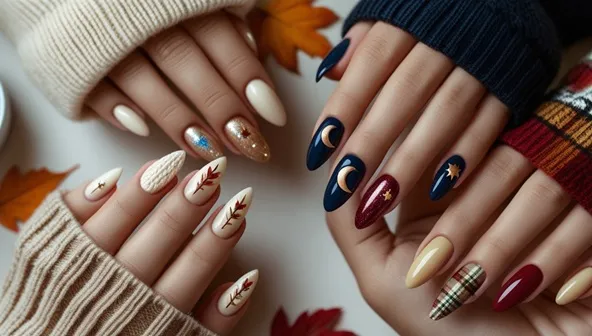
- Modern French Tip the Old French tip got an upgrade. In 2026, the tips are being done in unexpected colors — dusty lavender, sage green, soft coral — instead of stark white. The shape has shifted too: squiggly tips and rounded arches are replacing the rigid straight line. Use striping tape to get a clean edge while you’re learning.
- Dot Art (The Beginner’s Best Friend) A toothpick dipped in nail polish creates perfectly tiny dots. Scatter them randomly for a confetti effect, arrange them in a pattern, or cluster them near the cuticle for a delicate floral look. You don’t need a dotting tool to start — though they’re worth buying once you’re hooked.
- Thin Line Nails A single horizontal or vertical line across a neutral base looks effortlessly editorial. Use a thin nail brush or a striping brush (you can find these for under ₹100 at most beauty stores). Keep the line imperfect — that’s the charm.
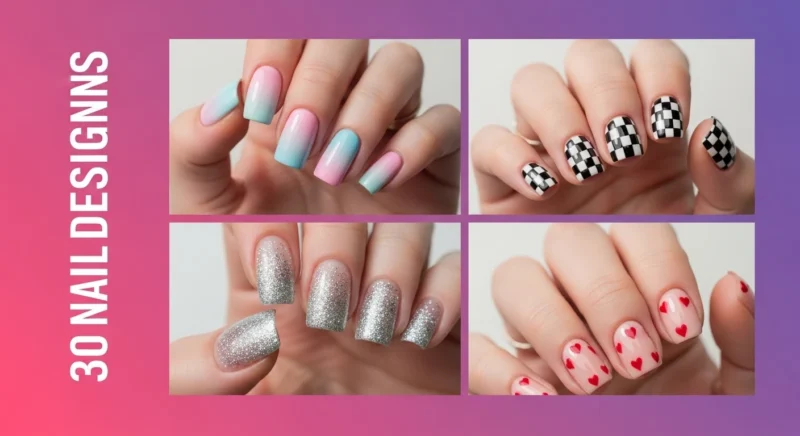
- Soft Pastel Set Baby pink on the thumb, mint on the index, pale yellow on the middle, lilac on the ring, and a soft peach on the pinky. No nail art skills required. Just pick five complementary pastels and wear one on each nail. It’s called a “rainbow mani” and it’s one of the most searched nail styles of 2026.
Accent Nail Designs
- The Glitter Accent Keep nine nails in a soft neutral and use glitter polish on your ring finger. This one technique instantly elevates a boring manicure. The ring finger is the traditional accent nail, but honestly — do what feels right to you.
- Chrome Powder Accent Chrome nail powder rubbed onto a cured gel base (or a special chrome-effect polish on regular nails) gives you a mirror-like finish on one nail. It looks extremely expensive and takes about two minutes.
- Gold Foil Detail Press tiny pieces of gold nail foil onto a wet top coat for an abstract, artistic effect. No two nails look the same, which is actually the point.
- Negative Space Accent Leave part of one nail bare (unpainted) and paint the rest. The contrast between your natural nail and the polish is the design itself. Geometric negative space looks particularly striking.
- Dual-Tone Half-and-Half Paint the lower half of the nail one color and the top half another. Use tape to get a clean diagonal or straight line. This works beautifully with contrasting colors (black and white) or tonal ones (two shades of the same pink).
Minimal Art Styles
- Tiny Hearts On a nude or blush base, use a toothpick to draw two small dots side by side, then drag them downward to a point. That’s a heart. Place one near the cuticle of your ring or index finger for a subtle, sweet detail.
- Floral Dots Five dots arranged in a circle with a smaller dot in the center. That’s a flower. Repeat on every nail or just one. Use contrasting colors — white flowers on navy, yellow flowers on white — for the most impact.
- Minimalist Smiley Face A simple curved line and two dots on a solid-color nail. It’s playful, it’s trendy, and you can do it freehand without any art skill.
- Star Cluster Use a very fine brush or toothpick to place tiny five-pointed stars scattered across your nail. White stars on a dark base or gold stars on a nude base both look stunning.
- Abstract Squiggle Draw a single wavy line across your nail using a thin brush. It doesn’t need to be perfect — the more organic it looks, the better. This is one of those designs where imperfection is the aesthetic.
Color-Based Designs
- Matte Finish Nails A matte top coat changes everything. Apply it over any nail polish color and the result looks luxurious and expensive. Matte burgundy, matte black, and matte nude are particularly striking.
- Ombre / Gradient Nails Apply two colors side by side on a makeup sponge, then dab the sponge onto your nail in a stamping motion. Blend the edges with a clean sponge. It takes practice to get smooth, but even imperfect ombre looks intentional.
- Two-Toned Diagonal Use tape placed diagonally across your nail. Paint above the tape in one color and below in another. Remove the tape before the polish dries. Clean, graphic, and impressive for something that takes five minutes.
- Peach and Cream A peachy-pink base with a cream or off-white tip. It’s a softer, more wearable take on the French manicure that suits Indian and South Asian skin tones particularly beautifully.
- Light Blue Calm Set Powder blue nails have been having their moment since late 2025 and aren’t going anywhere. A single shade of dusty or baby blue across all ten nails looks fresh, calm, and surprisingly versatile.
Texture and Finish Designs
- Glitter Fade (Gradient Glitter) Apply glitter polish only at the tip of the nail and use a sponge to fade it toward the center. The base stays clean and the glitter builds intensity at the edge. Gorgeous for evening occasions.
- Jelly Nails Sheer, glossy nails that let your natural nail show through. Apply a jelly-finish polish (or thin coats of a translucent shade) and finish with extra top coat for a glass-like, 3D effect.
- Milky White Nails An opaque white-pink that mimics the look of a full milk bottle. Multiple thin coats of a milky sheer white build to a soft, luminous finish. One of the most searched nail colors of 2026.
- Velvet Matte Effect Some nail polishes dry with a suede or velvet-like texture. No special tools needed — just apply, let dry, and skip the top coat. The texture itself is the design.
- Glossy Candy Colors High-shine cherry red, electric blue, hot pink — sometimes maximalism is the move. A single bold, glossy color with perfect application is striking and timeless.
Pattern Designs
- Checkerboard Use black and white (or any two contrasting colors) and striping tape to create a simple two-by-two grid pattern. Place tape vertically and horizontally, paint the exposed squares, remove tape. Repeat with alternate squares. This looks difficult but is very manageable once you understand the layering.
- Half Moon Nails Use a hole-reinforcer sticker (the kind used for paper) at the base of your nail to mask the lunula (the half-moon at the base). Paint the rest of the nail, remove the sticker, and paint the exposed half-moon in a contrasting color.
- Simple Geometric Shapes A triangle in the corner of a nail, a thin rectangle across the center, or a small circle near the tip. Use tape for clean edges. The shapes don’t need to be elaborate — one simple shape per nail is plenty.
- Stripe Set Three thin vertical stripes across a solid base using a striping brush. Alternate colors that complement the base — gold stripes on burgundy, white stripes on black, blush stripes on navy.
- Mixed Minimal Mani Different simple designs on each nail — one solid, one with dots, one with a line, one with a tiny shape, one with a glitter accent. There are no rules; this is your creative playground. The key is keeping the color palette cohesive so it all looks intentional rather than chaotic.
Also Read: Why Milky White Nails Are Trending in 2025
Nail Care Before You Even Open the Polish
Here’s something most nail art guides skip: your design is only as good as the surface underneath it. Before any polish goes on, do this:
Wash your hands and gently clean under your nails. File them into your preferred shape — oval and rounded square are the most forgiving shapes for beginners. Push back your cuticles (don’t cut them unless you know what you’re doing). Apply a base coat and let it dry fully before layering polish. This one step alone extends your manicure’s life dramatically.
Moisturize your hands and cuticles after everything is dry. Dry, cracked cuticles make even the best manicure look untidy.
Honest Tips from Someone Who Has Made Every Mistake
Thin coats always win. Two thin coats dry faster and last longer than one thick one. Thick coats peel and bubble.
Let each layer dry. I know it’s tempting to keep going. Wait. A full minute between coats makes a real difference.
Mistakes wipe off easily. Dip a small flat brush in acetone to clean up edges and smudges. This skill alone will transform your manicures.
Practice the design on paper or on a plastic bag first. Seriously. Before attempting checkerboard on your actual nails, do it five times on a surface where stakes are zero.
A top coat is non-negotiable. One layer of glossy top coat seals your design and adds at least three extra days of wear.
You don’t need a nail salon or a kit full of expensive tools to have beautiful nails. What you need is patience, a steady hand you’ll develop over time, and the willingness to try again when something doesn’t work out.
Start with the designs at the beginning of this list. Get comfortable with a clean single color before moving to ombre. Master dots before you attempt florals. Every nail artist you admire started exactly where you are.
The 30 designs in this guide will take you from complete beginner to someone who genuinely enjoys doing their own nails — which, honestly, is one of those small creative rituals that makes an ordinary week feel a little more intentional.